Pinterest for Bloggers: Infographics and images are a great way to promote a blog for free. And the best platform for this is Pinterest.
Pinterest is a huge platform that can drive massive traffic to your blog every month.
You can add your blog’s infographics, images, Gifs, and even videos as pins on Pinterest and make them appear on the top. Although, You have to do some basic SEO stuff like add title, description & tags.
So whenever a person finds it exciting and wants to know more. He/She will click on it and come to your site to know more about the pin.
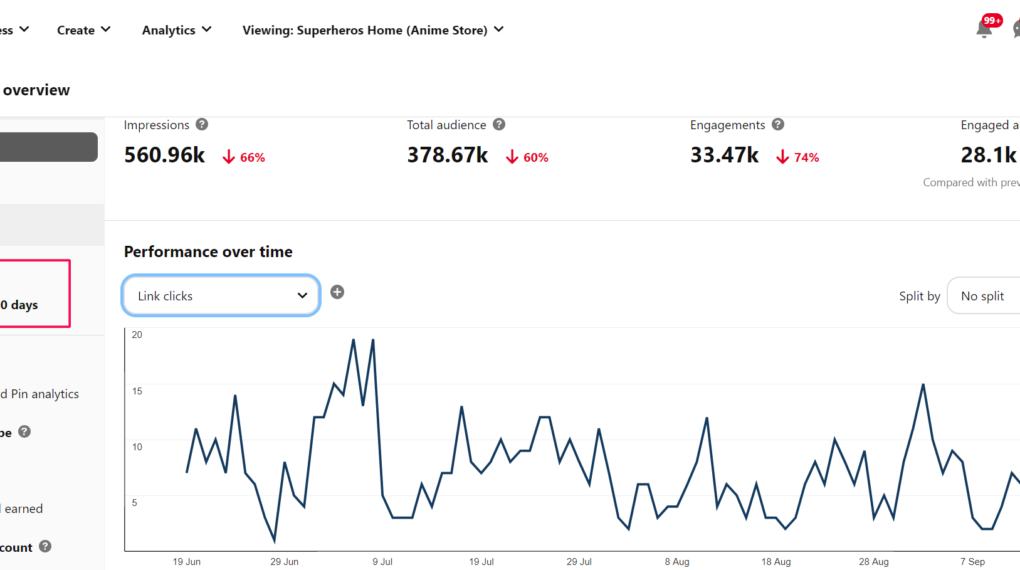
In fact, I am also using a Pinterest strategy for my micro niche blog that generates more than 550,000 impressions in the last 90 days.
Here is my Pinterest 90 days analytics,
Plus, I am also getting most social traffic on my blog Pinterest itself.

This is just the tip of the iceberg.
And the best part is, it’s all on automation. Yes! I didn’t even post my any blog pins on Pinterest instead used a tool to automate all the process.
And in this article, I’m going to share my all strategies that can help you achieve the same results.
Things you are going to learn in this article,
- How to use Pinterest: a step by step guide to add your blog
- Promote your blog content on Pinterest
- Optimize your pins with SEO for Pinterest
- Put Pinterest on autopilot to drive traffic on your blog every month
Pinterest basics that every blogger must know
Many of us think Pinterest is a social media platform but it’s actually a visual discovery search engine. That’s why SEO is also needed in Pinterest.
Where you can find informational as well as entertaining visual graphics and images as pins.
And where these pins belong are known as boards.
For being more simple, these boards are the category/topics and subtopics that Pinterest users used to categorize the pins.
You can also save other’s pins in your board.
Now let’s move on the main section of our guide,
How to Use Pinterest: step by step guide to Drive Traffic on Your Blog
In order to use Pinterest for you need to create a Pinterest and connect it with your blog or business.
Tip: If you already have a Pinterest account and want to use it to connect with your blog then use below steps.
Step 1. Create a Pinterest business account
Go to the Pinterest website and click on “Create a business account”

On the following page fill the asked information click on “Create account”
After that Pinterest will suggest you follow some topics, so select the topics that are relevant to your blog and business.
Step 2. Complete Pinterest profile
To edit your profile, you need to click on “settings” at the top right corner of your pinterest account.

On this page, add a profile photo, enter the display (blog/business name) and create a username.
Below on about section write some about your blog and add the keywords related to your blog like I did in my about section.
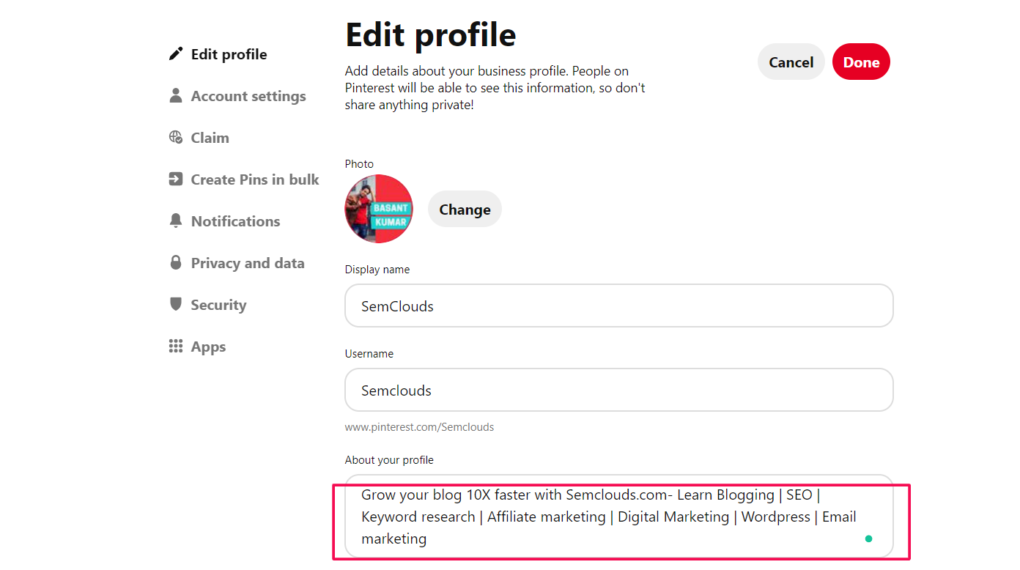
Pro tip: Add the minimum 3 – 5 Keywords as it will help in SEO. This way, you are telling Pinterest on what topics are relevant to your blog.
Step 3. Claim website
Next click on “claim” section
Here you need to connect your blog website with the Pinterest business account by claiming that you are the real owner.
This is a very simple step, just enter your blog domain and click on the claim button.

To verify click on “Add HTML tag” option and copy the presented HTML tag.
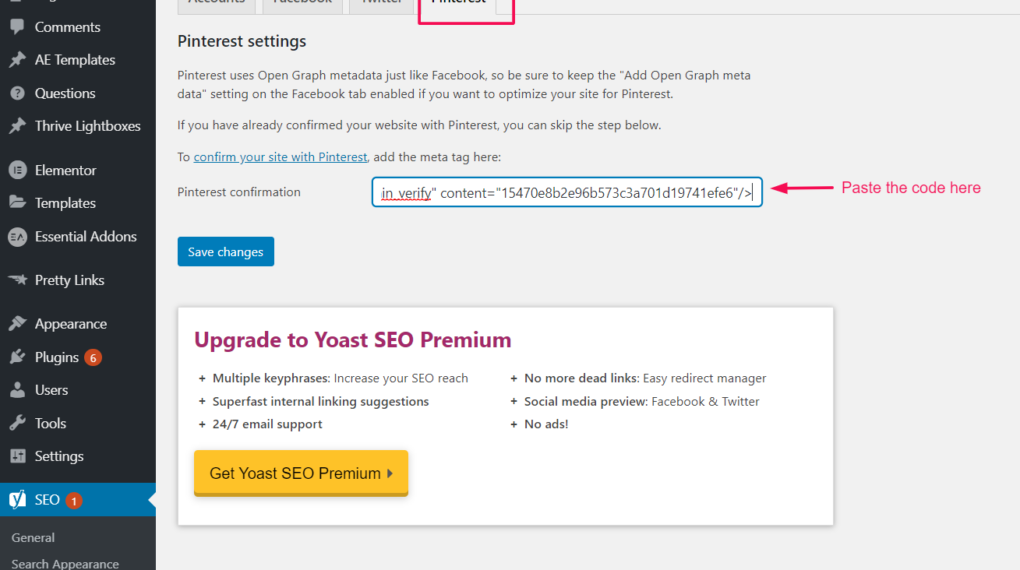
In the next step, you have to your blog and need to paste this code on the header section of the website.
Or if you have Yoast SEO plugin installed on your website then go to Yoast’s>Social section, click on Pinterest and paste the code.
After you finish this process, Pinterest will show that it will take 24 hrs to claim your site.
After the claim, a green check will be shown next to your domain.

After you finish this process, Pinterest will show that it will take 24 hrs to claim your site.
After the claim, a green check will be shown next to your domain.

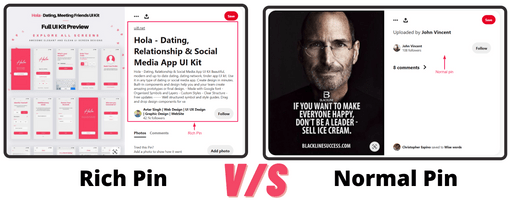
Step 4. Enable rich pins
Rich pins get the extra information like title, description from your blog image and shows with your pins on Pinterest.
Here’s the difference between a rich pin and a normal pin
There are four types of Rich Pins:
- Product Pins– real-time pricing, availability, and where to buy.
- Recipe Pins– ingredients, cooking times, and serving sizes.
- App Pins– (iOS only) show an install button to download the app without leaving Pinterest.
- Article Rich Pins– headline, author, and story description.
As bloggers article pins are best for us.
Let’s enable rich pins for our blog.
If your blog is made on wordpress then Yoast SEO already did the task for you while pasting the code.
But make sure your Yoast SEO plugin’s open graph metadata is enabled.

But if your site is made on other platforms then you need professional coders to add these rich pin metadata.
To check, the Rich pin is enabled or not on your blog, go to Rich Pins Validator and paste any link on your site.

Once your rich pins are enabled, Pinterest will email you to notify.
Note: Make sure your domain is successfully claimed in Pinterest before validating for rich pins. On this, your Pinterest account is connected to your blog/business and ready to post pins. But before posting pins one more important thing remained undone.
Step 5. Creating Pinterest boards
As I already told above boards are categories and topics to categorize the pins in a manner.
To start with creating at least 3 to 5 boards with the topics on which your blog is about.
My first boards were Blogging tips, SEO and you can also try to add these niche keywords naming or simply your blog category’s name on these boards.
After creating these boards you can start posting your pins or saving other’s pins in these boards.
Step 6. Create your first Pin and post on Pinterest
To create a beautiful pin you need an image editing software where you can edit the image in the Pinterest format of 2:3.
And the best software for creating Pinterest images in my suggestion is Canva (free tool).
You can find any kind of format to create images with infinite creative possibilities.
Just create an account and start creating.
Once you log in, search Pinterest, it will show many premade formats of beautiful designs and these are all in Pinterest ideal format 2:3.

Select any of these and start creating your first pin.
Once you created an image, it’s time to post it on Pinterest.
Go to Pinterest and click on “Create”
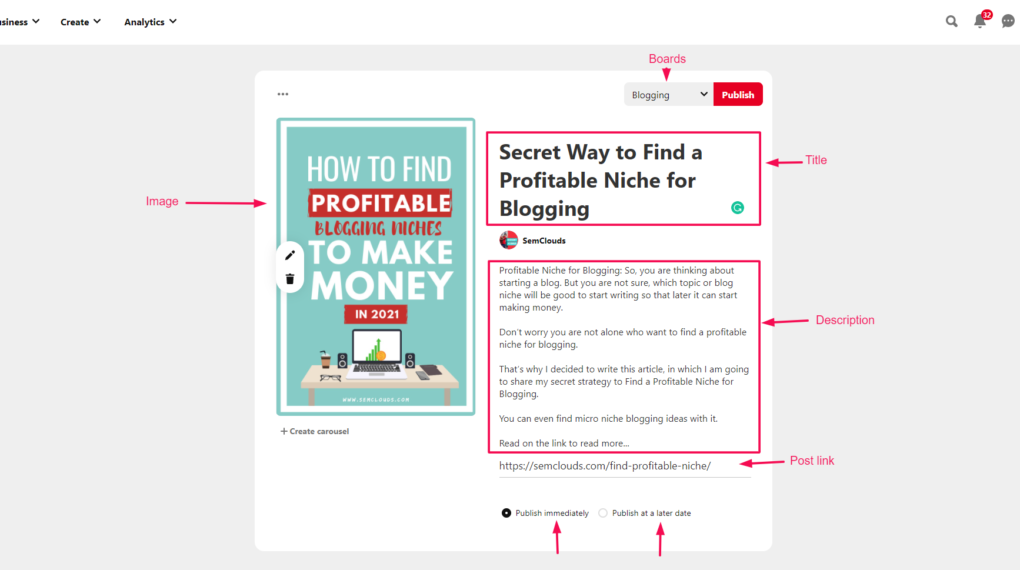
On this page, you can see multiple sections to add image, title, description and link of post for the pin.
Pro tip: Add your main keyword in the title, description for SEO.
Above is, boards selection feature, on which board you want to publish this pin.
And at the end 2 options available for publishing,
Publish immediately- this will publish the pin asap
Publish later- with this you can schedule your pins publishing timing.
Once everything is ready click on publish.
Congrats, your first pin is published!
Looking like this,

After some time you can even track its analytics like how many impressions it gets, click and saves etc.
Promoting Your Content on Pinterest
Do you know, there are also groups for various topics and niches on Pinterest but it’s not that easy to find them for beginners.
I have also joined some groups blogging and SEO related.
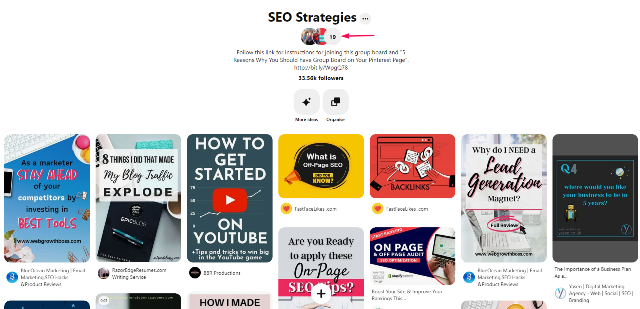
But trust me once you are accepted in those groups it will bring a massive boost to your Pinterest account as well as traffic in your blog.
So how to find these niche relevant groups on Pinterest and outreach them for joining.
Here’s the way
Go to the search section and type your keywords, related on which you want to find groups and select Boards as a filter.
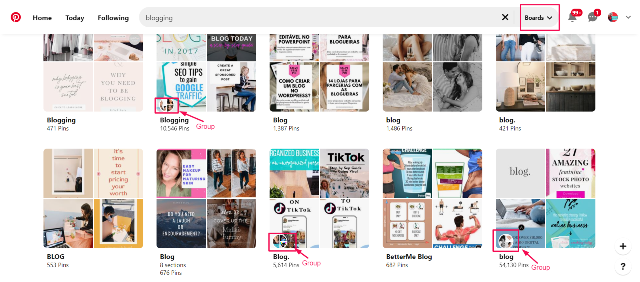
After the results appear, search for the boards that have circles of users, that Like I marked in the above image. These are groups.
Your next task is to outreach group members to let you join their group.
For outreaching these members, you can send messages to them telling that
“your pins are also relevant to their board and you want to join them to share informational stuff”.
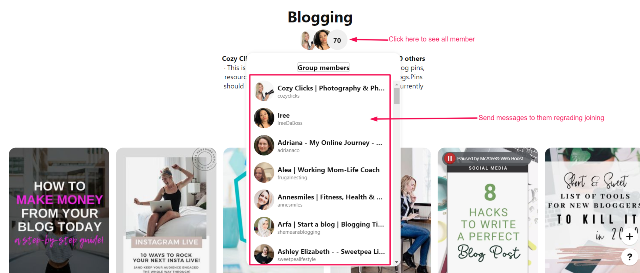

Send your personalised message to every group member to increase the chances of getting joined.
And once you join the group, you can also add your pins in these boards and leverage their followers.
Putting Pinterest on Automation to drive traffic on your blog
There are many tools plugins that can automate the process of posting pins for Pinterest.
And the best one in the market is Tailwind.

Tailwind is an automation website that integrates with your Pinterest with Instagram account and let you do many amazing things like,
- Schedule pins
- Analytics on pin engagement and performance
- Tracks new followers
- Specific board performance
- Collaboration tools for increased engagement
You can even add title, description with links for SEO Purpose while scheduling the pins.
Tailwind is definitely the one tool you need to use for automation if you want success in Pinterest. Their services start from 14$/month.
And they also offer a free trial without giving payment details to test their services and features before you spend the money.
In their free trial, you can schedule 100 pins and 30 Instagram posts.
Wrapping up
Pinterest indeed is an amazing platform to build audience and drive traffic to your blog, if you find the right approach.
And that approach with my proven strategy I shared in the above article.
So now it’s your turn to use Pinterest to get traffic and don’t forget to tell what you liked most in this post.
Till then take care and be a successful blogger.
3 comments
Thank you for thig guide Basant. Your results with Pinterest are impressive and I learned a tonne here.
Can’t wait to try it out for myself:)
Thank you, Nikola, am glad you like it…
Hello Basant,
Thanks for sharing this awesome and informative post. Your Pinterest traffic are quite impressive.
I really liked and appreciate the way you have explained each and every thing about Pinterest and how to use it for bloggers to increase traffic on your blog making the concept much simpler and easier. A must read post.
A complete step by step guide and after going through this post I must say this post will definitely going to help many of us. Keep writing more similar and informative post.
Thanks!
-Rijhu.